Scripting

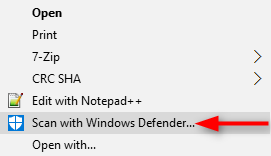
How to remove “Scan with Windows Defender” from the Context Menu

The following short batch script will automatically remove “Scan with Windows Defender” from the context menu for files, folders and drives in Windows 10.

:: Removes Windows Defender from the Context Menu for Files
REG DELETE HKEY_CLASSES_ROOT\*\shellex\ContextMenuHandlers\EPP /F
:: Removes Windows Defender from the Context Menu for Folders
REG DELETE HKEY_CLASSES_ROOT\Directory\shellex\ContextMenuHandlers\EPP /F
:: Removes Windows Defender from the Context Menu for Drives
REG DELETE HKEY_CLASSES_ROOT\Drive\shellex\ContextMenuHandlers\EPP /F

How to exclude specific applications with Lumension Endpoint Security

Open the Windows Registry Editor on the client machine.
Navigate to:
HKEY_LOCAL_MACHINE\SYSTEM\CurrentControlSet\Services\sk\Parameters.

Create a new DWORD (32-bit) value.
The NAME is the file path to the driver \application that you want to exclude, for example if you are excluding the Skype application:
For 64 bit: C:\Program Files (x86)\Skype\Phone\Skype.exe
For 32 bit: C:\Program Files\Skype\Phone\Skype.exe

The Value data is 0 (zero)
Restarting the application or the machine may be required for the change to take effect.
The application specified in the registry entry name will be excluded from protection by Lumension Endpoint Security.

You can of course automate this task by running something like this:

:: Set the file you would like to exclude
SET EXCLUSION="C:\Program Files\Skype\Phone\Skype.exe"

REG ADD "HKEY_LOCAL_MACHINE\SYSTEM\CurrentControlSet\Services\sk\Parameters" /v %EXCLUSION% /t REG_DWORD /d 0 /f

Automate your BIOS update in MDT

This universal script will automate your BIOS updates in MDT. In order for this script to work, you will need to configure your MDT deployment share with the following folder structure:
DeploymentShare$\Scripts\Custom\BIOS

Inside of the BIOS folder, you will need a folder for each model that you are supporting in your deployment. The folder names must match the model name that MDT queries with ZTIGather.
You can run wmic computersystem get model to get this value.

Folder Structure Example:
DeploymentShare$\Scripts\Custom\BIOS\10HY002AUS
DeploymentShare$\Scripts\Custom\BIOS\HP EliteBook 8560w

Inside of these folders, you will need to place all the files needed to install your BIOS update. You will also need to create custom files needed to silently install and determine the latest BIOS version.

1st File: BIOS.txt
In this txt file, you will place the BIOS version of the update. This is used to compare the BIOS version installed on the machine and the latest update version.
Example: FBKTCCAUS

2nd File: UpgradeBIOS.cmd
In this file you will add all the commands needed to silently install your BIOS update.
Example:

REM Setting Current Directory
cd "%~dp0"
WINUPTP.exe -s

Once you have the the folder structure completed, you will want to add a Reboot task to your Task Sequence. With this task, you will need to add an if statement with the following configuration:
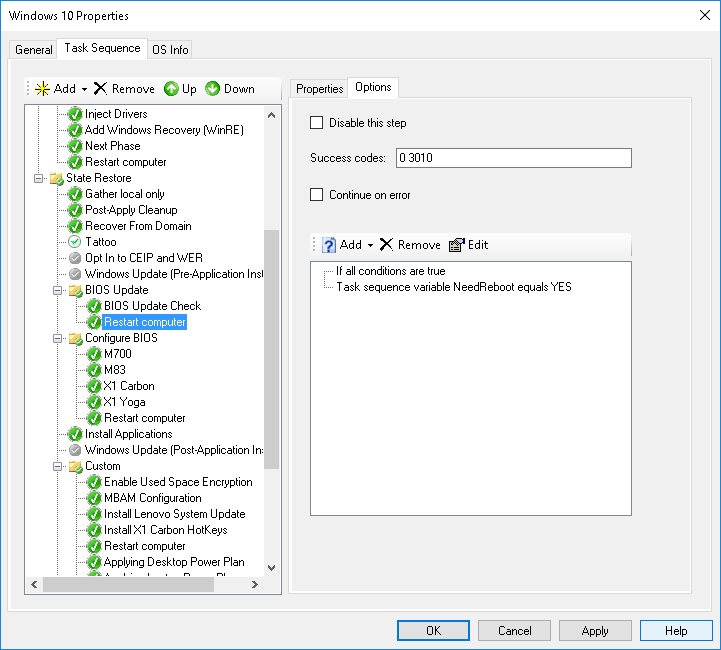
Reboot Task Configuration

And now for the actual Powershell script!

# Load MDT Task Sequence Environment and Logs
$TSenv = New-Object -COMObject Microsoft.SMS.TSEnvironment
$logPath = $tsenv.Value("LogPath")
$logFile = "$logPath\BIOS_Update.log"
 
# Start the logging 
 
Write-Output "Logging to $logFile." > $logFile
 
# Collect data
Write-Output "Collecting Data" >> $logFile
$ScriptRoot = (Get-location).Path
$Model = $TSenv.Value("Model")
$CompBiosVersion = (Get-WmiObject WIN32_BIOS).SMBIOSBIOSVersion
$CurrentBiosVersion = Get-Content "$ScriptRoot\$Model\BIOS.txt"
$Installer = "UpgradeBIOS.cmd"

try {
    Test-Path $CurrentBiosVersion -ErrorAction Stop
}
catch {
    Write-Output "BIOS.txt does not exist!" >> $logFile
}

Write-Output "Copying $ScriptRoot\$Model to C:\Temp\$Model" >> $logFile
Copy-Item "$ScriptRoot\$Model" "C:\Temp\$Model" -Force -Recurse
 
# Checking for BIOS update
if($CompBiosVersion.replace(' ' , '') -eq $CurrentBiosVersion.replace(' ' , '')) {
    Write-Output "BIOS is up to date." >> $logFile
    Exit
}
else {
    Write-Output "Updating BIOS $CompBiosVersion to $CurrentBiosVersion." >> $logFile
    Start-Process "cmd.exe" "/c C:\Temp\$Model\$Installer" -Wait
    $tsenv.Value("NeedReboot") = "YES"
    Write-Output "Update has been completed successfully." >> $logFile
    Exit
}

Query Available Windows Updates

The following script will allow you to query your available Windows Updates in Powershell and it will export it to a CSV file.

#Specify the location of where you want the CSV to be saved (Ex:\\Fileshare)
$location = "\\SHARE"

$MSsearch = New-Object -ComObject Microsoft.Update.Searcher
$Pending = $MSsearch.Search("IsInstalled=0") 
$Update = $Pending.Updates

$Title = $Update | Select-Object Title | foreach { $_.Title } 

$timeformat= "MM-dd"
$date = (Get-Date).ToString($timeformat)

if($Update.Count -eq 0) {
    Write-Host "There are no updates available for $env:Computername"
}

else {
  
    foreach($titles in $title){
        $kb = $titles.split('(')[-1].replace(')','')
        if($kb -like "kb*") {
            $table = New-Object –TypeName PSObject -Property @{ 
                'Title' = $Titles 
                'URL' = "https://support.microsoft.com/en-us/kb/$kb" 
            }
        }
        else {
            $table = New-Object –TypeName PSObject -Property @{ 
                    'Title' = $Titles 
                    'URL' = "Not Available" 
            }
        }
        $table | Select-Object Title, URL | Export-CSV -NoTypeInformation -Append "$location\Report.xml"
    }
    
}

How to reinstall all of the default Windows 10 apps

This short loop will reinstall all the default Windows 10 apps.

$pkgname = Get-AppxPackage -AllUsers | foreach { $_.packagefullname }
foreach($name in $pkgname) {
    Add-AppxPackage -register "C:\Program Files\WindowsApps\$name\AppxManifest.xml" -DisableDevelopmentMode
}

Get-TrackingInfo

It’s been a while since I have posted something, so here is a quick little function that can help you track your USPS packages right from your Powershell Console!

Example: Get-TrackingInfo -Trackingnumber YOUR-TRACKING-NUMBER-HERE

<#
 .Synopsis
    Track your USPS Packages
 .DESCRIPTION
    Track your USPS Packages right from the Powershell Console
 .EXAMPLE
    Get-TrackingInfo -Trackingnumber 555555555555
 #>
function Get-TrackingInfo  {
    Param([Parameter(Mandatory=$true)] $TrackingNumber)
    $invoke = (Invoke-Webrequest https://tools.usps.com/go/TrackConfirmAction?tLabels=$TrackingNumber).allelements | Where-Object  {$_.tagname -eq "tr" } 
    $information = $invoke | Select-Object OuterText -Unique -Skip 3
    $information | Format-Table @{Label=’Tracking Information’;Expression={$_.OuterText}}
}

Prevent users from creating Office 365 Groups

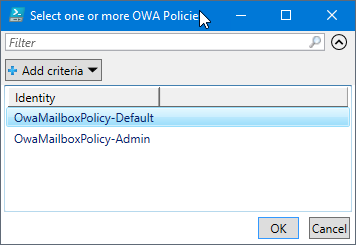
The script below will block users in a specified OWA Policy from creating Office 365 groups. The script uses Out-GridView to allow you to select which OWA Policy you want to assign this rule to.

#Office 365 Credentials
$username = "USERNAME"
$password = "PASSWORD"

try {
    #Attempts to connect to Office 365 and install Modules
    Import-Module MSOnline
    $pass = convertto-securestring -String "$password" -AsPlainText -Force 
    $credential = new-object -typename System.Management.Automation.PSCredential -argumentlist $username, $pass
    Connect-MsolService -Credential $credential -ErrorAction Stop
    $ExchangeSession = New-PSSession -ConfigurationName Microsoft.Exchange -ConnectionUri "https://outlook.office365.com/powershell-liveid/" -Credential $credential -Authentication "Basic" -AllowRedirection
    Import-PSSession $ExchangeSession >null
}
catch [Microsoft.Online.Administration.Automation.MicrosoftOnlineException] {
    #Logs error for incorrect password
    Write-Host "Please verify your username and password"
    Write-EventLog -LogName Application -Source "Office 365 Log" -EntryType Error -EventId 1 -Message "OFFICE 365 AUTOMATIC LICENSE ASSIGNMENT`n`nError Connecting to Office 365! Please verify your user name and password"
    exit
}

catch {
    #Log for any other error
    Write-Host "Error Connecting"
    Write-EventLog -LogName Application -Source "Office 365 Log" -EntryType Error -EventId 1 -Message "OFFICE 365 AUTOMATIC LICENSE ASSIGNMENT`n`nError Connecting to Office 365!"
    exit
}
$OWA = Get-OwaMailboxPolicy | Select Identity | Out-Gridview -Title "Select one or more OWA Policies" -PassThru | foreach { $_.Identity } 
if($OWA.count -eq 0) {
    Write-Host "Please rerun the script and select an OWA Policy"
}
else {
    if($OWA.count -gt 1) {
        foreach($MultiOWA in $OWA) {
            Set-OwaMailboxPolicy -Identity $MultiOWA -GroupCreationEnabled $False
        }
    }
    else {
        Set-OwaMailboxPolicy -Identity $OWA -GroupCreationEnabled $False
    }    
}

Automate your Meraki Client VPN Connection

Cisco does a great job with their documentation but unfortunately they didn’t do so well with explaining how to configure their VPN connection for medium to large scale companies. Their documentation only explains how to configure the connection manually, so I decided to use my Powershell skills to write up something really quick. Luckily for us, this task is extremely simple with Powershell.

The following script will automatically configure your Meraki VPN connection on Windows 10:

$ServerAddress = "VPN SERVER ADDRESS"
$ConnectionName = "VPN CONNECTION NAME"
$PresharedKey = "YOUR PRESHARED KEY"
Add-VpnConnection -Name "$ConnectionName" -ServerAddress "$ServerAddress" -TunnelType L2tp -AllUserConnection -L2tpPsk "$PresharedKey" -AuthenticationMethod Pap -Force

This script can be deployed using GPO, your existing system management system or even added to your images with MDT or SCCM.

I hope this helps someone out!

Automatically join a machine to your domain

This short script will join a machine to your domain. This can be useful as a post start up script that will launch after a machine has been imaged.

$domain = "DOMAIN"
$password = "PASSWORD HERE" | ConvertTo-SecureString -asPlainText -Force
$username = "$domain\USERNAME HERE" 
$credential = New-Object System.Management.Automation.PSCredential($username,$password)
Add-Computer -DomainName $domain -Credential $credential

Feel free to comment if you have any questions!

Operating System Audit

Recently I noticed that Kaseya (our system management system) does not always update the operating system name when a computer has been upgraded. It can take a while for a computer to report back in and provide accurate information. Since we finished up our Windows 10 upgrades, we wanted to be 100% sure that we upgraded all our machines. So to verify this information I wrote a script to find out every machine’s operating system in our network.

Read more