Deployment

How to programmatically configure file associations in Windows 10 and Server 2016 without DISM

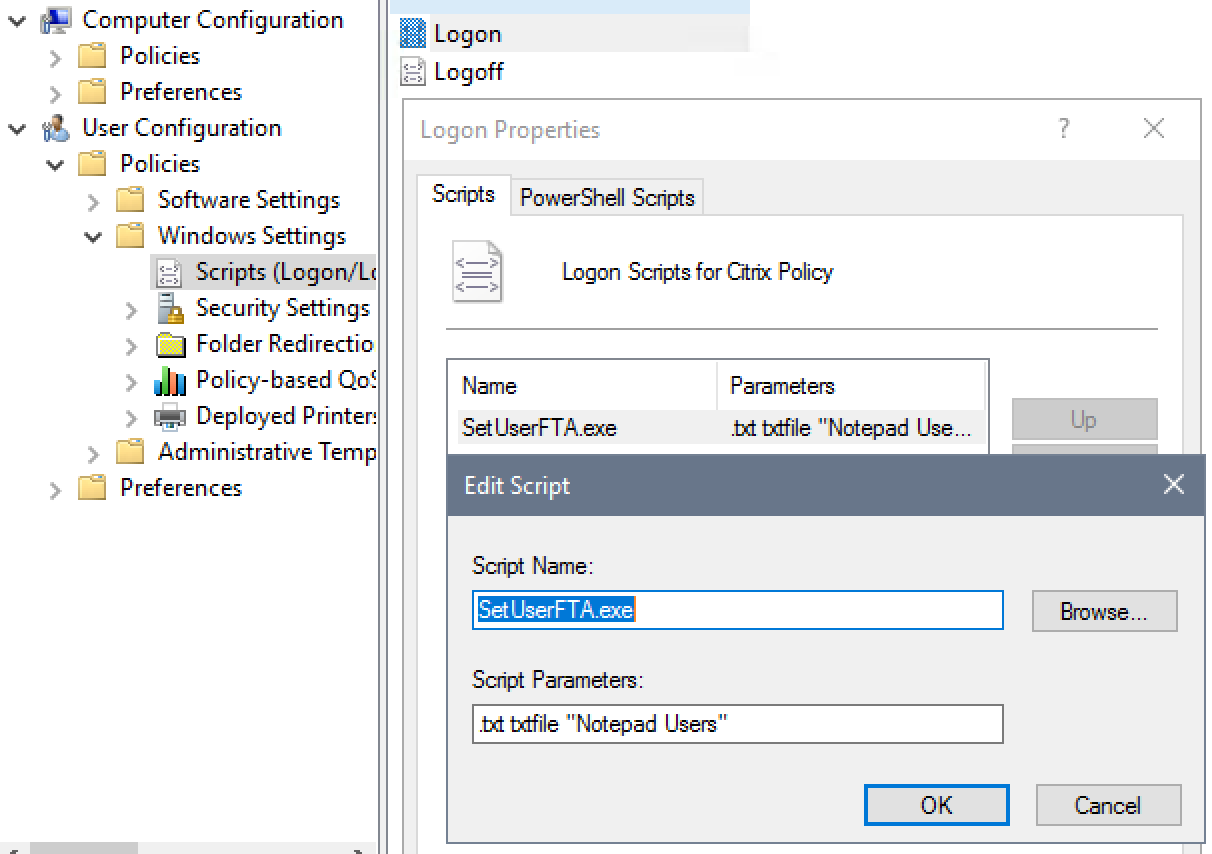
If you are reading this, you are most likely aware that Microsoft has changed how you can configure file associations. Pre-Windows 8, we were able to configure file associations by manipulating the registry but now this method does not work because Microsoft verifies a hash key to determine if the change was made by the user.

Until recently, the only way to configure file associations in Windows 10 was to use DISM to import your file associations XML or use a GPO which would lock down your associations. Using the DISM method only worked for new users so any existing users would have to manually configure their file associations. Luckily someone named Christoph Kolbicz has reverse engineered the algorithm used by Microsoft to create the hash key so now we can programmatically configure file associations!

You are probably wondering how you can do this. Well.. Christoph has been kind enough to share a command line tool that he has created and that you can download from his website http://kolbi.cz/blog/?p=346.

How do you use it?
It’s easy! You can just run the following command to make Adobe Reader DC the default pdf reader for the current logged in user:

SetUserFTA.exe .pdf AcroExch.Document.DC

For more information about SetUserFTA.exe goto http://kolbi.cz/blog/?p=346!

How to capture a Windows 10 image like a boss with MDT!

In this guide we are going to create a brand new Windows 10 1709 reference image with MDT 8450.
Read more

Workaround for missing start menu tiles after a Windows 10 1709 upgrade

I have noticed recently that some users that have upgraded from 1607 to 1709 have lost their Start Menu tiles during the upgrade. I did a lot of research on the Start Menu topic and could only find one article from Microsoft stating that they were replacing the TileDataLayer feature with something called the TileStore. You can see the list of features that are removed or deprecated in Windows 10 Fall Creators Update here.

I’m suspecting that there is an issue migrating the tiles to this new feature and it is causing the start layout to become corrupt during the upgrade for some users. I even have a ticket open with Microsoft concerning this issue but unfortunately it does not look like it will be fixed anytime soon.

So here is my workaround and hopefully it can help someone else.

First you will need to make sure to export every user’s start layout. I am doing this with a scheduled task that will run the following Powershell command:

Export-StartLayout –path $env:LOCALAPPDATA\LayoutModification.xml

This will export the user’s existing start layout and it will copy it to their %LOCALAPPDATA% folder.

Once you have given the scheduled task enough time to export everyone’s start layout, you can start the upgrade and run the following script at logon to bring back the user’s customized start layout:

If((Test-Path $env:LOCALAPPDATA\LayoutModification.xml) -eq $True) {
    Copy-Item $env:LOCALAPPDATA\LayoutModification.xml $env:LOCALAPPDATA\Microsoft\Windows\Shell\LayoutModification.xml -Force
    Remove-Item 'HKCU:\Software\Microsoft\Windows\CurrentVersion\CloudStore\Store\Cache\DefaultAccount\$start.tilegrid$windows.data.curatedtilecollection.root' -Force -Recurse
    Get-Process Explorer | Stop-Process
}

Note: If you are experiencing this issue with 1809, you can run the following script to bring back the user’s customized start layout:

If((Test-Path $env:LOCALAPPDATA\LayoutModification.xml) -eq $True) {
    Copy-Item $env:LOCALAPPDATA\LayoutModification.xml $env:LOCALAPPDATA\Microsoft\Windows\Shell\LayoutModification.xml -Force
    Remove-Item 'HKCU:\Software\Microsoft\Windows\CurrentVersion\CloudStore\Store\Cache\DefaultAccount\*$start.tilegrid$windows.data.curatedtilecollection.tilecollection'  -Force -Recurse
    Get-Process Explorer | Stop-Process
}

How to fix Outlook 2016 search issues after a 1709 upgrade

Are you getting “Something went wrong and your search couldn’t be completed.” after you have upgraded to Windows 10 1709? As of right now Microsoft has not released an update to specifically address the issue but there is a workaround that you can add to your 1709 post clean up script. All you have to do is run a repair on Office 2016 after your computer has been upgraded to 1709.

You can do this automatically by running the following command:

MSIEXEC.exe /f {90160000-0011-0000-0000-0000000FF1CE} /qn

UPDATE 3/21/2018:
According to a few reports, running the following script after the 1709 upgrade will fix the search issue so you do not have to run a repair on Office!

REG ADD “HKEY_LOCAL_MACHINE\SOFTWARE\WOW6432Node\Microsoft\Windows\Windows Search\Preferences” /v “{0077B49E-E474-CE11-8C5E-00AA004254E2}” /t REG_DWORD /d 1 /f
REG ADD “HKEY_LOCAL_MACHINE\SOFTWARE\WOW6432Node\Microsoft\Windows\Windows Search\Preferences” /v “{4154494E-BFF9-01B8-00AA-0037D96E0000}” /t REG_DWORD /d 1 /f
REG ADD “HKEY_LOCAL_MACHINE\SOFTWARE\WOW6432Node\Microsoft\Windows\Windows Search\Preferences” /v “{70fab278-f7af-cd11-9bc8-00aa002fc45a}” /t REG_DWORD /d 1 /f
REG ADD “HKEY_LOCAL_MACHINE\SOFTWARE\WOW6432Node\Microsoft\Windows\Windows Search\Preferences” /v “{C0A19454-7F29-1B10-A587-08002B2A2517}” /t REG_DWORD /d 1 /f
REG ADD “HKEY_LOCAL_MACHINE\SOFTWARE\WOW6432Node\Microsoft\Windows\Windows Search\Preferences” /v “{c34f5c97-eb05-bb4b-b199-2a7570ec7cf9}” /t REG_DWORD /d 1 /f

How to automatically configure your default profile in Windows 10

Ever since Windows 10 was released, COPYPROFILE has been a major issue for administrators. It causes your default profile to be extremely large and it constantly causes issues with the Start Menu and other items in the Windows 10 OS. While developing a Windows 10 image, I found that injecting OS settings into C:\Users\Default\NTUser.dat has been the best way to configure the default profile. A year after upgrading over 2000 computers to Windows 10, I can now confidently say this method works 100% of the time and I really hope others start to use it more often.

Luckily for you, I have done the dirty work and can provide you with a starting point that can automatically configure settings for you. Keep in mind that you will need to run this script before running SYSPREP and it will change the settings for any new users. Good luck and please feel free to leave any questions in the comments below.

reg load HKLM\DEFAULT c:\users\default\ntuser.dat

# Advertising ID
reg add "HKLM\DEFAULT\Software\Microsoft\Windows\CurrentVersion\AdvertisingInfo" /v Enabled /t REG_DWORD /d 0 /f

#Delivery optimization, disabled
reg add "HKLM\DEFAULT\Software\Microsoft\Windows\CurrentVersion\DeliveryOptimization" /v SystemSettingsDownloadMode /t REG_DWORD /d 3 /f

# Show titles in the taskbar
reg add "HKLM\DEFAULT\Software\Microsoft\Windows\CurrentVersion\Explorer\Advanced" /v TaskbarGlomLevel /t REG_DWORD /d 1 /f

# Hide system tray icons
reg add "HKLM\DEFAULT\Software\Microsoft\Windows\CurrentVersion\Explorer" /v EnableAutoTray /t REG_DWORD /d 1 /f

# Show known file extensions
reg add "HKLM\DEFAULT\Software\Microsoft\Windows\CurrentVersion\Explorer\Advanced" /v HideFileExt /t REG_DWORD /d 0 /f

# Show hidden files
reg add "HKLM\DEFAULT\Software\Microsoft\Windows\CurrentVersion\Explorer\Advanced" /v Hidden /t REG_DWORD /d 1 /f

# Change default explorer view to my computer
reg add "HKLM\DEFAULT\Software\Microsoft\Windows\CurrentVersion\Explorer\Advanced" /v LaunchTo /t REG_DWORD /d 1 /f

# Disable most used apps from appearing in the start menu
reg add "HKLM\DEFAULT\Software\Microsoft\Windows\CurrentVersion\Explorer\Advanced" /v Start_TrackProgs /t REG_DWORD /d 0 /f

# Remove search bar and only show icon
reg add "HKLM\DEFAULT\SOFTWARE\Microsoft\Windows\CurrentVersion\Search" /v SearchboxTaskbarMode /t REG_DWORD /d 1 /f

# Show Taskbar on one screen
reg add "HKLM\DEFAULT\Software\Microsoft\Windows\CurrentVersion\Explorer\Advanced" /v MMTaskbarEnabled /t REG_DWORD /d 0 /f

# Disable Security and Maintenance Notifications
reg add "HKLM\DEFAULT\SOFTWARE\Microsoft\Windows\CurrentVersion\Notifications\Settings\Windows.SystemToast.SecurityAndMaintenance" /v Enabled /t REG_DWORD /d 0 /f

# Hide Windows Ink Workspace Button
reg add "HKLM\DEFAULT\SOFTWARE\Microsoft\Windows\CurrentVersion\PenWorkspace" /v PenWorkspaceButtonDesiredVisibility /t REG_DWORD /d 0 /f

# Disable Game DVR
reg add "HKLM\DEFAULT\System\GameConfigStore" /v GameDVR_Enabled /t REG_DWORD /d 0 /f
reg add "HKLM\DEFAULT\SOFTWARE\Microsoft\Windows\CurrentVersion\GameDVR" /v AppCaptureEnabled /t REG_DWORD /d 0 /f

# Show ribbon in File Explorer
reg add "HKLM\DEFAULT\SOFTWARE\Microsoft\Windows\CurrentVersion\Explorer\Ribbon" /v MinimizedStateTabletModeOff /t REG_DWORD /d 0 /f

# Hide Taskview button on Taskbar
reg add "HKLM\DEFAULT\SOFTWARE\Microsoft\Windows\CurrentVersion\Explorer\Advanced" /v ShowTaskViewButton /t REG_DWORD /d 0 /f

# Hide People button from Taskbar
reg add "HKLM\DEFAULT\SOFTWARE\Microsoft\Windows\CurrentVersion\Explorer\Advanced\People" /v PeopleBand /t REG_DWORD /d 0 /f

# Hide Edge button in IE
reg add "HKLM\DEFAULT\SOFTWARE\Microsoft\Internet Explorer\Main" /v HideNewEdgeButton /t REG_DWORD /d 1 /f

# Remove OneDrive Setup from the RUN key
reg delete "HKLM\DEFAULT\SOFTWARE\Microsoft\Windows\CurrentVersion\Run" /v OneDriveSetup /F

reg unload HKLM\DEFAULT

If you would like to customize the Start Menu Tiles, please refer to my earlier post:
https://www.joseespitia.com/2016/06/27/customized-a-windows-10-start-layout/

Removing Duplicate Windows Boot Manager Entries in your MDT Task Sequence

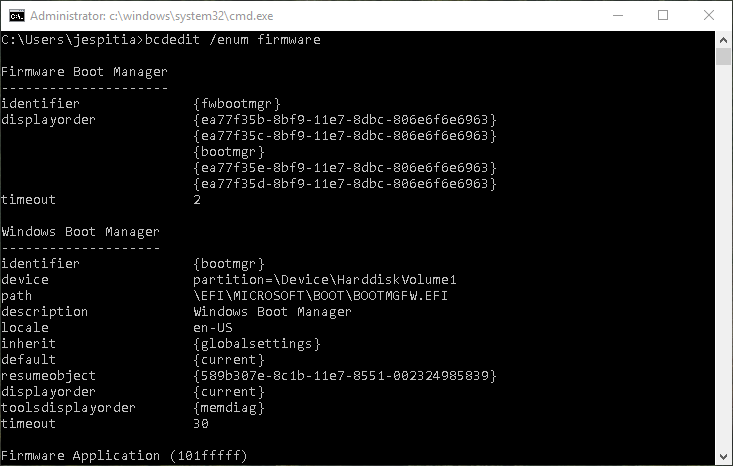
We recently purchased quite a few Dell XPS 13 9365 laptops and while testing our image; I noticed that the list of Windows Boot Manager entries in the BIOS was growing each time I would image the laptop. In order to get around this, I had to create the following script that would automatically scan through the Boot Configuration Data (BCD) store and remove all of the duplicate GUID’s that appear after running the image.

# CONFIGURE MDT LOGGING
$TSenv = New-Object -COMObject Microsoft.SMS.TSEnvironment 
$LogPath = $TSenv.Value("LogPath")  
$LogFile = "$LogPath\WindowsBootManagerRemoval.log"

Start-Transcript $LogFile

# LOCATE GUID
$Identifiers = BCDEDIT /ENUM FIRMWARE | Select-String "identifier" | ForEach-Object { $_ -replace "identifier" }

If($Identifiers -ne $Null) {
    
    $IdentifierList = $Identifiers.Replace(" ","") | Where-Object {$_ -notcontains "{fwbootmgr}" -and $_ -notcontains "{bootmgr}"}
    
    Write-Host "" 
    Write-Host "--------------------------------------------------------------------------------" 
    Write-Host "PREPARING TO REMOVE DUPLICATE WINDOWS BOOT MANAGER ENTRIES"
    Write-Host "--------------------------------------------------------------------------------" 
    Write-Host "" 

    # REMOVE GUIDS
    ForEach($Identifier in $IdentifierList) {
        BCDEDIT /Delete $Identifier
        Write-Host "DELETED $Identifier"
    }
}
Else {
    Write-Host "SKIPPING - COULD NOT LOCATE DUPLICATE WINDOWS BOOT MANAGER ENTRIES"
}

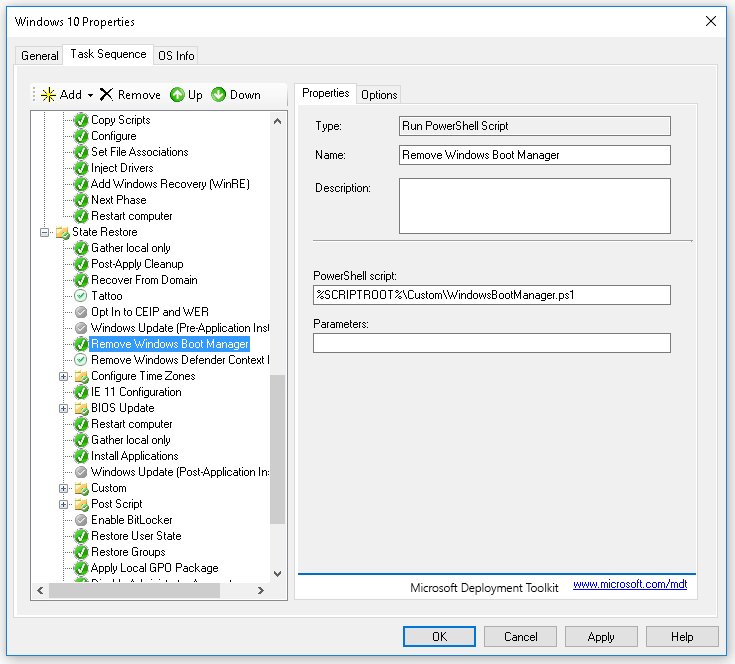
Once you are ready to use the script, go ahead and copy it over to your Deployment Share and add it to your State Restore group in your MDT Task Sequence.
MDT Task Sequence

Since this was not happening to all of our computer models, I made sure to add a Task Sequence condition that forced this step to only run for the Dell XPS 13 9365 laptops.

Feel free to leave any questions below!

Windows 10 Creators Update 1703 Cleanup Script

The following script is intended to run after an in place upgrade (Ex: 1607 to 1703). If you do not know how to run a post script after an upgrade, please refer to my previous post here.

The Powershell script will copy your old wallpapers from C:\Windows.old\windows\Web\Wallpaper\Windows\ and C:\Windows.old\windows\Web\4K\Wallpaper\Windows\ to their appropriate folders. It will also uninstall OneDrive, and prevent OneDriveSetup.exe and Windows Defender from running at logon. As well as remove the Contact Support application, move Office 2016 applications to their appropriate folder in the Start Menu (During my testing, these shortcuts moved around randomly), and attempt to remove any new apps that have reappeared with the upgrade.

Logging is enabled in the script and the entire cleanup log can be located in C:\Logs\1703-Upgrade.log

<#  

.FUNCTIONS
    1 - Set-FilePermissions
        Configures file permissions

    2 - Set-FileOwnership
        Configures ownership of files

    3 - Get-TimeStamp
        Configures timestamp for logs

    4 - Write-Log
        Creates a log for the script

#>

# Configure Functions

Function Set-FilePermissions {
    param (
     [parameter(Mandatory=$true)]
     [ValidateNotNullOrEmpty()]$File,
     [parameter(Mandatory=$true)]
     [ValidateNotNullOrEmpty()]$User,
     [parameter(Mandatory=$true)]
     [ValidateNotNullOrEmpty()]$Control,
     [parameter(Mandatory=$true)]
     [ValidateNotNullOrEmpty()]$Access
    )

    $ACL = Get-ACL "$File"
    Set-Acl -Path "$File" -AclObject $ACL
    $Permission = New-Object  system.security.accesscontrol.filesystemaccessrule("$User","$Control","$Access")
    $Acl.SetAccessRule($Permission)
    Set-Acl -Path "$File" -AclObject $ACL

}

Function Set-FileOwnership {
    param (
     [parameter(Mandatory=$true)]
     [ValidateNotNullOrEmpty()]$File,
     [parameter(Mandatory=$true)]
     [ValidateNotNullOrEmpty()]$User
    )

    $ACL = Get-ACL "$File"
    $Group = New-Object System.Security.Principal.NTAccount("$User")
    $ACL.SetOwner($Group)
    Set-Acl -Path "$File" -AclObject $ACL

}

function Get-TimeStamp {
    
    return "[{0:MM/dd/yy} {0:HH:mm:ss}]" -f (Get-Date)
    
}

function Write-Log {
    param (
    [parameter(Mandatory=$true)]
    [ValidateNotNullOrEmpty()]$Passed,
    [parameter(Mandatory=$true)]
    [ValidateNotNullOrEmpty()]$Failed
    )
    
    If ($ProcessError.Count -eq 0) {
        Write-Output "$(Get-TimeStamp) $Passed" >> C:\Logs\1703-Upgrade.log
    }
    Else {
        Write-Output "$(Get-TimeStamp) $Failed" >> C:\Logs\1703-Upgrade.log
        $Global:Errors++
        $ProcessError.Clear()
    }
}

<# -- Script begins below --  #>

$Errors = 0

Write-Output "$(Get-TimeStamp) CLEANUP SCRIPT STARTED" > C:\Logs\1703-Upgrade.log
Write-Output " " >> C:\Logs\1703-Upgrade.log
Write-Output "$(Get-TimeStamp) START COPYING WALLPAPERS" >> C:\Logs\1703-Upgrade.log

# Update Wallpaper
Set-FileOwnership -File "C:\windows\web\Wallpaper\Windows\img0.jpg" -User Users
Set-FilePermissions -File "C:\windows\web\Wallpaper\Windows\img0.jpg" -User Users -Control FullControl -Access Allow
Copy-Item "C:\Windows.old\windows\Web\Wallpaper\Windows\img0.jpg" -Destination "C:\windows\web\Wallpaper\Windows\img0.jpg" -Force -ErrorVariable +ProcessError
Write-Log -Passed "Copied C:\windows\web\Wallpaper\Windows\img0.jpg to C:\windows\web\Wallpaper\Windows\img0.jpg" -Failed "Failed to copy C:\windows\web\Wallpaper\Windows\img0.jpg to C:\windows\web\Wallpaper\Windows\img0.jpg"

# Update 4k Wallpapers
$Wallpapers = Get-ChildItem C:\Windows\Web\4K\Wallpaper\Windows
ForEach($Wallpaper in $Wallpapers) {
    Set-FileOwnership -File $Wallpaper.FullName -User Users
    Set-FilePermissions -File $Wallpaper.FullName -User Users -Control FullControl -Access Allow

    $FileName = $Wallpaper.Name
    $FilePath = $Wallpaper.FullName

    Copy-Item C:\Windows.old\windows\Web\4K\Wallpaper\Windows\$FileName -Destination $Wallpaper.FullName -Force -ErrorVariable +ProcessError
    Write-Log -Passed "Copied C:\Windows.old\windows\Web\4K\Wallpaper\Windows\$FileName to $FilePath" -Failed "Failed to copy C:\Windows.old\windows\Web\4K\Wallpaper\Windows\$FileName to $FilePath"
}   

# Uninstall OneDrive
Write-Output " " >> C:\Logs\1703-Upgrade.log
Write-Output "$(Get-TimeStamp) UNINSTALLING ONEDRIVE" >> C:\Logs\1703-Upgrade.log
Start-Process C:\Windows\SysWOW64\OneDriveSetup.exe /uninstall -Wait -ErrorVariable +ProcessError
Write-Log -Passed "Uninstalled OneDrive successfully" -Failed "Failed to uninstall OneDrive"

# Rename OneDriveSetup.exe (This is to prevent OneDrive First Run)
Write-Output " " >> C:\Logs\1703-Upgrade.log
Write-Output "$(Get-TimeStamp) RENAMING ONEDRIVESETUP.EXE TO PREVENT ONEDRIVE FROM RUNNING AT LOGON" >> C:\Logs\1703-Upgrade.log
Set-FileOwnership -File C:\Windows\SysWOW64\OneDriveSetup.exe -User Users
Set-FilePermissions -File C:\Windows\SysWOW64\OneDriveSetup.exe -User Users -Control FullControl -Access Allow
Rename-Item C:\Windows\SysWOW64\OneDriveSetup.exe C:\Windows\SysWOW64\OneDriveSetup.exe.old -ErrorVariable +ProcessError
Write-Log -Passed "Renamed C:\Windows\SysWOW64\OneDriveSetup.exe to C:\Windows\SysWOW64\OneDriveSetup.exe.old" -Failed "Failed to rename C:\Windows\SysWOW64\OneDriveSetup.exe to C:\Windows\SysWOW64\OneDriveSetup.exe.old"

# Remove OneDrive run key
Write-Output " " >> C:\Logs\1703-Upgrade.log
Write-Output "$(Get-TimeStamp) REMOVING ONEDRIVE RUN KEY FROM THE DEFAULT'S NTUSER.DAT FILE" >> C:\Logs\1703-Upgrade.log
cmd /c REG LOAD "HKLM\DEFAULT_USER" "C:\Users\Default\NTUSER.DAT" 
Remove-ItemProperty -Path "HKLM:\DEFAULT_USER\SOFTWARE\Microsoft\Windows\CurrentVersion\Run" -Name "OneDriveSetup" -ErrorVariable +ProcessError
Write-Log -Passed "Removed OneDriveSetup from the default profile's run key" -Failed "Failed to remove OneDriveSetup from the default profile's run key"
cmd /c REG UNLOAD "HKLM\DEFAULT_USER"

# Delete run key for Windows Defender
Write-Output " " >> C:\Logs\1703-Upgrade.log
Write-Output "$(Get-TimeStamp) REMOVING WINDOWS DEFENDER FROM THE CURRENT USER RUN KEY" >> C:\Logs\1703-Upgrade.log
Remove-ItemProperty -Path "HKLM:\SOFTWARE\Microsoft\Windows\CurrentVersion\Run" -Name "SecurityHealth" -ErrorVariable +ProcessError
Write-Log -Passed "Removed SecurityHealth from the current user's run key" -Failed "Failed to remove SecurityHealth from the current user's run key"

# Remove Contact Support
Write-Output " " >> C:\Logs\1703-Upgrade.log
Write-Output "$(Get-TimeStamp) REMOVING THE CONTACT SUPPORT APPLICATION" >> C:\Logs\1703-Upgrade.log
Get-WindowsCapability -online | ? {$_.Name -like ‘*ContactSupport*’} | Remove-WindowsCapability –online -ErrorVariable +ProcessError
Write-Log -Passed "Removed the Contact Support application" -Failed "Failed to remove the Contact Support application"

# Move Office 2016 Applications to correct folder in the Start Menu if needed
Write-Output " " >> C:\Logs\1703-Upgrade.log
Write-Output "$(Get-TimeStamp) MOVING OFFICE 2016 APPLICATIONS TO CORRECT FOLDER IN START MENU" >> C:\Logs\1703-Upgrade.log
$OfficePrograms = GCI "C:\ProgramData\Microsoft\Windows\Start Menu\Programs" | Where-Object name -like "*2016.lnk"

If($OfficePrograms.count -gt 0) {
    ForEach($Program in $OfficePrograms) {
    $OfficeFilePath = $Program.FullName
    $OfficeFileName = $Program.Name
    Copy-Item "$OfficeFilePath" -Destination "C:\ProgramData\Microsoft\Windows\Start Menu\Programs\Microsoft Office 2016\$OfficeFileName"  -Force -ErrorVariable +ProcessError
    Remove-Item "$OfficeFilePath"
    Write-Log -Passed "Copied $OfficeFilePath to C:\ProgramData\Microsoft\Windows\Start Menu\Programs\Microsoft Office 2016\$OfficeFileName" -Failed "Failed to copy $OfficeFilePath to C:\ProgramData\Microsoft\Windows\Start Menu\Programs\Microsoft Office 2016\$OfficeFileName"

    }
}
Else {
    Write-Output "$(Get-TimeStamp) Did not find any Office 2016 programs outside of C:\ProgramData\Microsoft\Windows\Start Menu\Programs\Microsoft Office 2016" >> C:\Logs\1703-Upgrade.log
}


# Remove 1703 apps
Write-Output " " >> C:\Logs\1703-Upgrade.log
Write-Output "$(Get-TimeStamp) PREPARING TO REMOVE APPS" >> C:\Logs\1703-Upgrade.log
$AppsList = "Microsoft.WindowsFeedbackHub", "Microsoft.XboxIdentityProvider", "Microsoft.Windows.HolographicFirstRun", "Windows.ContactSupport", "Microsoft.XboxGameCallableUI", "HoloShell", "HoloItemPlayerApp", "HoloCamera", "Microsoft.OneConnect", "Microsoft.People", "Microsoft.XboxSpeechToTextOverlay", "Microsoft.XboxGameOverlay", "Microsoft.SkypeApp", "Microsoft.MicrosoftSolitaireCollection", "Microsoft.MicrosoftOfficeHub", "Microsoft.3DBuilder", "Microsoft.Getstarted", "Microsoft.Microsoft3DViewer", "Microsoft.Office.OneNote", "Microsoft.XboxApp", "Microsoft.ZuneMusic", "Microsoft.ZuneVideo", "Microsoft.MSPaint"
ForEach ($App in $AppsList)
{
  $PackageFullName = (Get-AppxPackage $App).PackageFullName
  $ProPackageFullName = (Get-AppxProvisionedPackage -online | where {$_.Displayname -eq $App}).PackageName
  Write-Host $PackageFullName
  Write-Host $ProPackageFullName

  If ($PackageFullName)
  {
    Write-Host “Removing Package: $App”
    Remove-AppxPackage -package $PackageFullName -ErrorVariable +ProcessError
    Write-Log -Passed "Removed $App" -Failed "Failed to remove $App"

  }
  else
  {
    Write-Output "$(Get-TimeStamp) Unable to find package: $App” >> C:\Logs\1703-Upgrade.log
  }

  if ($ProPackageFullName)
  {
    Write-Host “Removing Provisioned Package: $ProPackageFullName”
    Remove-AppxProvisionedPackage -online -packagename $ProPackageFullName -ErrorVariable +ProcessError
    Write-Log -Passed "Removed $ProPackageFullName" -Failed "Failed to remove $ProPackageFullName"
  }
  else
  {
    Write-Output "$(Get-TimeStamp) Unable to find provisioned package: $App” >> C:\Logs\1703-Upgrade.log
  }
}
$ErrorCount = $Errors
Write-Output " " >> C:\Logs\1703-Upgrade.log
Write-Output "$(Get-TimeStamp) CLEANUP COMPLETE - FOUND $ErrorCount ERRORS" >> C:\Logs\1703-Upgrade.log

How to run a post script after a Windows 10 feature upgrade with SetupConfig.ini

If you are planning on upgrading your Windows 10 OS from 1607 to 1703 you may have noticed that a few apps have reappeared. Luckily for us, Microsoft has provided a way to add parameters to upgrades with the SetupConfig.ini file.

For example, you can create a Setupconfig.ini with the following:
Note that the header [SetupConfig] is required.

[SetupConfig]
NoReboot
ShowOobe=None
Telemetry=Enable

This is equivalent to the following command line:

Setup.exe /NoReboot /ShowOobe None /Telemetry Enable

How does the upgrade use the SetupConfig.ini file?
If the update is delivered through Windows Update, Windows Setup searches in a default location for a setupconfig file. You can include the setupconfig file here:
“%systemdrive%\Users\Default\AppData\Local\Microsoft\Windows\WSUS\SetupConfig.ini”

How do you run a post script?
You can easily add a post script by adding the PostOOBE parameter to the SetupConfig file as shown below:

[SetupConfig]
PostOOBE=C:\SetupComplete.cmd

How do you run a Powershell script?
The only way that I have been able to run a Powershell script is by running it from the .cmd file that I have called using the PostOOBE parameter.

Inside of the cmd file, you would have to add the following command to launch a Powershell script:

Powershell.exe -ExecutionPolicy Bypass -File "C:\Scripts\Remove-Apps-1703.ps1" -WindowStyle Hidden

I hope this post helps you understand the power of this ini file. Feel free to leave any questions in the comments and stay tuned for the cleanup script that I am currently working on!

UPDATE: The post clean up script can be found here!

How to remove the Contact Support app in Windows 10 1607 and above

The Contact Support app can now officially be removed but the process is a little different than how you would normally remove a Windows app with Powershell. Luckily it isn’t too difficult and it can be done with a one liner!

Get-WindowsCapability -online | ? {$_.Name -like ‘*ContactSupport*’} | Remove-WindowsCapability –online

New laptop chassis type is not recognized by MDT

I recently ran into an issue where MDT could not determine if our new Dell XPS 13 9365 was a laptop or desktop. After running wmic path win32_systemenclosure get chassistypes, I was able to determine that the chassis type 31 was not listed in MDT’s ZTIGather.wsf. Adding 31 to ZTIGather.wsf (Line 417) as shown below, fixed the issue and MDT was now able to determine that the XPS 13 9365 was a laptop!

Example:

Select Case objInstance.ChassisTypes(0)
Case "8", "9", "10", "11", "12", "14", "18", "21", "31"
	bIsLaptop = true
Case "3", "4", "5", "6", "7", "15", "16"
	bIsDesktop = true
Case "23"
	bIsServer = true
Case Else
	' Do nothing
End Select

Feel free to leave any questions in the comment section!